Monday, February 27, 2012

CALL ME MAMA LEISHA GUEST POST

Hi! My name is Aleisha, but my hilarious and zany five-year-old occasionally calls me "Mama Leisha!" I am thrilled about guest posting for The Wood Connection today. I love The Wood Connection store as much as I love pots of gold, four leaf clovers, and Lucky Charms cereal. And since I'm Irish (okay, okay, only by marriage), I thought I would show you how to make a grand St. Patrick's Day craft. (No leprechauns required.) You'll need: --wood --vinyl --paint --sandpaper --paintbrush
Step #1: Paint your wood board a lovely shade of green. (The more likely it is to resemble the rolling hills of Ireland, the better!) Let it dry completely.


Step #2: Paint a single coat of white paint over the top. Let it dry completely.


Step #3: Using sandpaper, distress your board; focusing on sanding the white area. (And yes, I know I'm in desperate need of a manicure!)


Step #4: Apply your cute vinyl lettering...which can always be purchased at The Wood Connection!


Step #5: Paint over the whole thing, using that fantastic green color again. It's very important that you let the coat of paint dry completely!

Step #6: Here's the fun part! Gently and slowly peel off the vinyl lettering. (Going slow is important!) Using sandpaper again (and if you'd like to), distress the board.


Step #7: Dance a St. Patty's Day jig because your project is finished!


My camera does not do the lettering on my board justice. The reverse vinyl effect gives the lettering a "stenciled on" look, while painting the board green, then white, and then distressing it, creates an "old," artistic, faded-out look. It's way cooler than the Blarney Stone! I took a closeup picture of the lettering to give you a better idea of how the project turned out.


Thank you again to The Wood Connection for this opportunity, and for being generous enough to give away a $25 gift certificate to a "LUCKY" reader! Please stop by my blog, "She Calls Me Mama Leisha," at http://callmemamaleisha.blogspot.com/ for a chance to enter the drawing.
Happy St. Patrick's Day!

Friday, February 24, 2012

ST. PATRICKS ITEMS

What’s better than a pot of gold? 
OUR ST. PATRICK’S DAY LINE!
Well maybe not quite but pretty close.

 Shamrock Trio on base and dowel
$16.40


Standing Leprechaun Hat
$6.95
Optional "kiss me" vinyl .75


Kiss Me Letter Set
$11.95
“me” vinyl .75 


Leprechaun Shoes
$6.50 a shoe 


 Large Shamrock Door Hang
$15.95
Optional monogram vinyl $2.95


 LUCKY (Suzy Q Font)
$1.95 per letter


Small Shamrock Door Hang
$14.95
Optional “lucky” vinyl $2.00


*All images and designs are Copyright of
THE WOOD CONNECTION. 
Any violation of our copyright will result in legal action. 
Thank you for not stealing our designs.**
 
*We do NOT ship
*Stock on item changes daily

"LEAP” INTO OUR NEW STORE…

EXCITING NEWS!!
YOU CAN “LEAP” INTO OUR NEW AMERICAN FORK STORE
ON LEAP DAY WEDNESDAY, FEBRUARY 29TH.

To celebrate the opening we will be giving away a $10.00 gift certificate
everyday on our Facebook page until we open.
Good luck!

Tuesday, February 21, 2012

EASTER SNEAK PEEK

We are "hoppy" to announce that
our Easter items are out and in stock!
Here is a little sneak peek...
 
Hop is $12.95
optional block $1.25
"Down The Bunny Trail" vinyl $2.00 


**All images and designs are Copyright of
THE WOOD CONNECTION. 
Any violation of our copyright will result in legal action. 
Thank you for not stealing our designs.**
 
*We do NOT ship
*Stock on item changes daily

Monday, February 20, 2012

CRAFTING WITH HEART GUEST POST


 Hi! I'm Cortney from Crafting With Heart, and I am so so so excited to be with you guys today on the Wood Connection! I am a full time student and I work full time, but I always can make time for crafts! I discovered the Wood Connection a couple of years ago and each month I love going to see what new decorations they have out. Right now they are featuring the St. Patrick's Day decorations. What I love about the Wood Connection is that they have so many different choices and you can either copy their ideas, or make it your own. I combined a couple of their projects to make my door hang. 


I love to paint stripes on the bead board. The lines don't have to be perfect, sometimes the mistakes are what makes it your own!


The small clover is from a different project. I bought the dangles and used the clover dangle to add to this project. While I was there, I noticed that they had two St. Patrick's projects with different sayings. One was "Lucky in Love" and the other was "Keep Calm and Pinch On". Both sayings were so cute that I knew I wanted to add one to my project! You can also buy the little wooden heart at the Wood Connection. 


Thank you again to the Wood Connection for letting me have so much fun guest blogging for them! As an awesome bonus, they gave me a $25 gift certificate to give away to one of my lucky followers! Come to my blog and check it out!!


Photobucket

Wednesday, February 15, 2012

VALENTINES WINNERS

We are so excited to announce
the winners of our Valentine's contest! 

We have so many creative customers!
Thank you to everyone who participated.
The winners of our $25.00 gift certificates are…

Brittney Posey


Brooke Marsh

Courtney Walker

Congratulations to our winners!

Tuesday, February 14, 2012

HAPPY VALENTINE'S DAY!

HAPPY VALENTINE’S DAY!! WE OUR CUSTOMERS!!!
Come in today and receive a sweet suPRIZE!
Draw from our basket to receive extra discounts or prizes!

Monday, February 13, 2012

CRAFTING CHICKS GUEST POST

Hey! It's Becky, one of the five Crafting Chicks. We have enjoyed working with The Wood Connection to make some fun things. Today I'm going to share my wood growth chart I made. I sure love it and so do my girls.


I had been looking for a great growth chart a few years ago, but couldn't find anything that would work for me. I love the vinyl ones, but don't want to leave it behind if we ever move. There are other cute fabric and wood charts out there, but the prices kept me away. Wood Connection to the rescue. This was my answer!


Here is what you will need:
  • a wooden board
  • paint
  • vinyl lines and numbers
  • wood letters for the name (you could also do vinyl if you wanted)
  • a ruler
  • pencil
  • scrapbook paper
  • Mod Podge
I found this 5'x2' wooden board at Wood Connection. It is really cute and has beveled edges. I painted each board and then began to measure. I wanted to start the chart at their birth height and then just go up from there.
I put the foot marks on first and then added my numbers to that. After those were on, I put the inch marks on. I added a few vinyl flowers.
Painted the letters and Mod Podged cute scrapbook paper on them to match their rooms. I inked the edges of the letters to give them some more depth.
I then put some hanging hardware on the back. Measured up the wall to the height that I had started the markings and voila. A fun growth chart for many memories and years to come!


Now as a fun treat for all of you. Wood Connection has given me a $25 gift certificate to giveaway. Just leave a comment below by Thursday, February 16th for your chance to win!

--
The Crafting Chicks
www.thecraftingchicks.com

Twitter: @craftingchicks
Facebook: www.facebook.com/thecraftingchicks

Tuesday, February 7, 2012

AMERICAN FORK HERE WE COME!

WE ARE THRILLED TO ANNOUNCE THAT WE WILL BE OPENING A SATELLITE STORE IN AMERICAN FORK!!!
We will keep you updated as to when it will be opening.
 
Currently we are looking for friendly, out going
and crafty staff members who live in the American Fork area.
If you are interested please download an application by
clicking the "Download Now" button below.
Please email the application to woodconnection@live.com

Please fill it out completely and email it or walk it in.
We look forward to meeting you!

Monday, February 6, 2012

FRESH LIVING SEGMENT

Look for us tomorrow on
Fresh Living at 1:00 on KUTV Channel 2.
We will be making these easy,
last minute Valentines Subway Art Signs. 

 
And…
We will be giving away TEN $10.00 gift certificates to the store.
See you all tomorrow!
 
Rachel & Allison

BRIDGEY WIDGEY GUEST POST


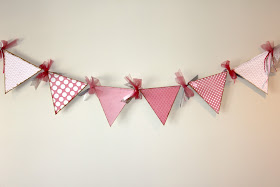
Let's get this party started!!! I am Bridget from Bridgey Widgey and I am a party stylist, mom, and blogger. I always enjoy a good craft project, but especially when I can use it for my parties. As a party stylist I am always looking for different ways to decorate a party with out breaking the bank. I also love the idea of making something once but using it for party after party. This is why I am excited to be pairing up with The Wood Connection. The people at The Wood Connection probably thought I was crazy because I was  a combination of a kid on Christmas morning mixed with a bargain shopper on black friday. I was going crazy with excitment! They have so many fun things to create at a killer price.  I won't lie it was hard for me to settle on just one project but eventually I decided on their wood pendant flags. I chose these because it is perfect for those non-sewers and cost effective. You can get two banners out of one, or make one into a chalk board that I will show later in this post. The possibilities are endless! I loved this craft SO much because it didn't take a lot of time, yet it adds that punch of decor that takes the party to the next level.


So let's get started....


I am first going to show you how to create the chalk board banner.

(one side of the banner)

To get the chalk board effect you will want to follow these steps:
'

Next, turn over your chalk board flags and follow these steps to get an additional banner on the reverse side.


Step 1: Trace the wood on the paper of your choice.  My paper is all from The Wood Connection. This place is really a one stop shop!


Step 2. Using the wood glue they sell, apply a thin coat onto the wood and adhere the paper.


Step 3. Don't worry if you didn't cut it out exactly. You can use a razor blade to cut off the excess paper.


Step 4: Ink the edges. (optional)


Step 5: String the banner through the holes. I used bakers twine and added some colorful ribbon I got from The Wood Connection.


Step 6. Hang your banner. I like to use these command strips for easy set up and take down.


Now, I want to show you how versatile these banners are. I made this pink banner for a princess party I have coming up in April, but I wanted to use it now for Valentine decor. I used some magnates to easily attach and remove wood letters that I purchase at The Wood Connection for 89 cents.


All you have to do is paint, glue, and attach. Pretty easy right?


Want to know my favorite part besides that it is reversible? It stores up small and easy.


I want to say thanks again to The Wood Connection for letting me be a guest blogger.  I encourage you to come and follow my blog because The Wood Connection is going to be giving away 25 dollars to one of my lucky follower.
What are you waiting for? Come and check it out!


null