Let's get this party started!!! I am Bridget from Bridgey Widgey and I am a party stylist, mom, and blogger. I always enjoy a good craft project, but especially when I can use it for my parties. As a party stylist I am always looking for different ways to decorate a party with out breaking the bank. I also love the idea of making something once but using it for party after party. This is why I am excited to be pairing up with The Wood Connection. The people at The Wood Connection probably thought I was crazy because I was a combination of a kid on Christmas morning mixed with a bargain shopper on black friday. I was going crazy with excitment! They have so many fun things to create at a killer price. I won't lie it was hard for me to settle on just one project but eventually I decided on their wood pendant flags. I chose these because it is perfect for those non-sewers and cost effective. You can get two banners out of one, or make one into a chalk board that I will show later in this post. The possibilities are endless! I loved this craft SO much because it didn't take a lot of time, yet it adds that punch of decor that takes the party to the next level.
So let's get started....
I am first going to show you how to create the chalk board banner.
(one side of the banner)
To get the chalk board effect you will want to follow these steps:
Next, turn over your chalk board flags and follow these steps to get an additional banner on the reverse side.

Step 1: Trace the wood on the paper of your choice. My paper is all from The Wood Connection. This place is really a one stop shop!
Step 2. Using the wood glue they sell, apply a thin coat onto the wood and adhere the paper.
Step 3. Don't worry if you didn't cut it out exactly. You can use a razor blade to cut off the excess paper.
Step 4: Ink the edges. (optional)
Step 5: String the banner through the holes. I used bakers twine and added some colorful ribbon I got from The Wood Connection.
Step 6. Hang your banner. I like to use these command strips for easy set up and take down.
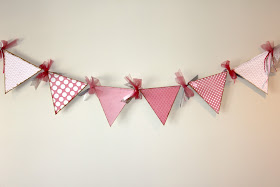
Now, I want to show you how versatile these banners are. I made this pink banner for a princess party I have coming up in April, but I wanted to use it now for Valentine decor. I used some magnates to easily attach and remove wood letters that I purchase at The Wood Connection for 89 cents.
All you have to do is paint, glue, and attach. Pretty easy right?

Want to know my favorite part besides that it is reversible? It stores up small and easy.
I want to say thanks again to The Wood Connection for letting me be a guest blogger. I encourage you to come and follow my blog because The Wood Connection is going to be giving away 25 dollars to one of my lucky follower.
What are you waiting for? Come and check it out!


Very Cute Bridget!! I love this fun little banner!
ReplyDeleteCute idea.
ReplyDeleteI am in love with your magnet trick! My brain doesn't think like that! I so appreciate the creative thinkers, thanks for the possibilities!
ReplyDeleteThanks for your ideas! I'm in awe of the magnet idea, so many possibilities. (If this comment posts twice- sorry!)
ReplyDeleteThis is a fabulous idea....we are going to do this in our house immediately!
ReplyDelete